Why Choose Exhibition Stand Kits for Australian Events?
Before diving into the setup process, it’s important to understand why Exhibition Stand Kits are so popular across Australian trade shows and expos.
These kits are designed for:
-
Fast and tool-free assembly
-
Lightweight transport between venues
-
Modular layouts for different booth sizes
-
Professional branding without custom build costs
Whether you’re exhibiting at a small regional expo or a major national event, these systems are engineered to simplify your experience.
Step 1: Unpack and Organise Your Components
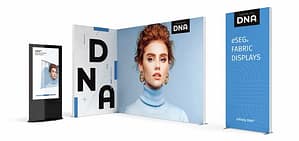
Start by carefully unpacking your Exhibition Stand Kits from their protective carry cases. Most kits include:
-
Aluminium frames or modular structures
-
Tension fabric graphics
-
Connector pieces or stabilising feet
-
Optional accessories such as lighting or counters
Lay everything out in your allocated booth space. This helps you visualise the final setup and ensures no components are missing.
Because the frames are lightweight yet durable, you can easily handle the parts without needing special equipment.
Step 2: Assemble the Frame Structure
The backbone of your Exhibition Stand Kits is the frame. These are typically made from precision-engineered aluminium tubing that clicks or slots together.
You simply:
-
Match the labelled frame sections
-
Connect them using built-in push-fit or snap-lock systems
-
Secure stabilising feet or base supports
Most exhibitors are surprised at how intuitive the process feels. You do not need technical skills or a professional installer. The modular design ensures everything aligns correctly, reducing the risk of setup errors.
Step 3: Attach the Fabric Graphics
Once the frame is fully assembled, it’s time to add your branded graphics.
Exhibition Stand Kits usually feature high-quality tension fabric prints. These are designed to:
-
Stretch smoothly over the frame
-
Zip or fasten securely at the back
-
Deliver seamless, wrinkle-free branding
Start at the top and gently pull the fabric down over the structure. Once zipped or secured, the tension creates a polished, professional appearance that instantly elevates your booth presence.
This step is where your brand truly comes to life.
Step 4: Install Lighting and Accessories
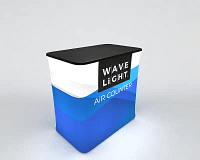
To maximise visual impact, many Exhibition Stand Kits allow you to add:
-
LED lighting
-
Shelving units
-
Counters or podiums
-
Monitor brackets
Attach lighting fixtures according to the included instructions. LED systems are energy-efficient and ideal for Australian exhibition venues where power access may vary.
Strategic lighting highlights your graphics and ensures your message stands out across busy show floors.
Step 5: Position and Adjust Your Stand
Now that your structure is complete, position it carefully within your allocated booth space.
Check that:
-
The stand aligns with venue boundaries
-
Walkways remain clear
-
Graphics are facing high-traffic areas
Because Exhibition Stand Kits are lightweight, minor adjustments are easy. You can reposition panels or slightly angle sections to create a welcoming booth layout.
This flexibility is especially valuable when working with corner or inline stands.
Step 6: Final Checks Before the Event Opens
Before doors open, take a few minutes to inspect your setup.
-
Ensure graphics are smooth and fully zipped
-
Confirm lighting is functioning properly
-
Wipe down surfaces and counters
-
Store empty cases neatly behind your stand
A final walkthrough helps you spot any adjustments needed and ensures your display looks flawless when visitors arrive.
The Advantage of Modular Exhibition Stand Kits
One of the greatest benefits of using Exhibition Stand Kits is their reusability. After the event, you can:
-
Disassemble quickly
-
Pack components into compact cases
-
Transport easily to your next exhibition
This makes them ideal for businesses attending multiple Australian trade shows throughout the year. Instead of rebuilding from scratch each time, you simply reassemble your existing system.
Make Your Next Exhibition Setup Simple
Setting up your exhibition booth does not need to be stressful or time-consuming. With Exhibition Stand Kits, you gain a streamlined system that combines professional presentation with practical convenience.
From frame assembly to final lighting adjustments, each step is designed to be intuitive and efficient. You save time, reduce labour costs, and maintain a consistent brand presence across every event you attend.
When you choose a modular, easy-to-assemble solution, you give yourself more time to focus on what truly matters at exhibitions in Australia: connecting with visitors, generating leads, and growing your business.
Your next successful event starts with a stand you can assemble confidently and effortlessly.